Ok, we had our big holiday, now it’s Dad’s turn.
What to get for them this year?
Dads can sometimes be a little hard to buy for, depending on their hobbies.
BUT, the one thing you know they will always love is to see some pictures of their cuties, staring back at them while they are toiling away at work (or at least we think they would, right?)
So, while searching for a fun Father’s Day photo gift, we found an idea we both liked on HowDoesShe.com here.
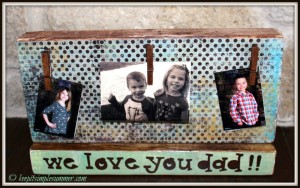
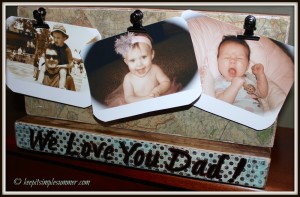
It’s a very simple picture holder made from 2×4’s you can customize with scrapbook paper, stain, clips, and any embellishments you want. You don’t even need any fancy tools to make it and the clips let you change out the pictures.
Ding, ding, ding. We have a winner!
We loved these DIY Desk Photo Holder’s because you can use scrap wood you have lying around and they are a fun gift for anybody.
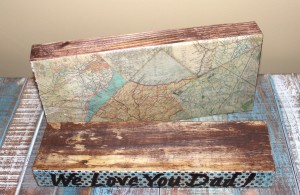
Here’s how ours Father’s Day themed ones turned out (we had to keep them pretty manly so we left off the bows and sparkles).
If you want to make one too, here’s how to do it:
Materials needed
- 2 equal length pieces of wood (we used a length of 12″, 2x4s or something similar work great)
- scrapbook paper
- small clips, clothespins, or binder clips
- stain
- wood glue
- sandpaper
- stencils/stickers
- Sharpie/marker in your color of choice
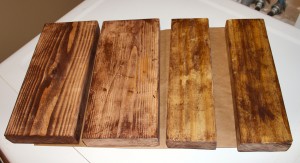
Get 2 pieces of equal length wood. We used wood that was 12 inches long. The original design used 2×4’s, but since we didn’t have 48 inches of 2x4s lying around we used 2 pieces that measured 1 1/2″ x 5 1/2″ x 12″ for the top and 2 pieces that measured 1 1/2″ x 3 1/2″ x 12″ for the bottom.
We stained all four pieces of wood with a dark walnut stain from Rustoleum. You could stain them whatever color you like or wait until the scrapbook paper is already on and then stain.
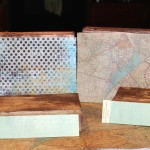
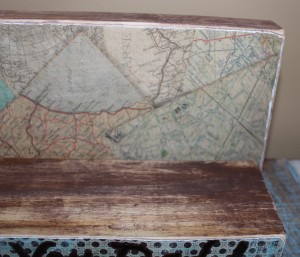
Next we chose the scrap book paper we wanted for the front sides of the boards and cut to size.
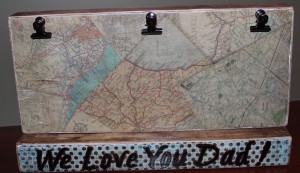
On the thin strip of paper used to cover the bottom board, we stenciled “We love you Dad!!” or used stickers to spell it out. If you had mad handwriting skills you could do this freehand, but Tabitha and I still write like first graders so we reverted to stencils & stickers.

Using Modge Podge we adhered the scrapbook paper to the front sides of the boards.
After the Modge Podge was dry we sanded the edges to give it a little bit of a roughed up look.
Then we used wood glue to glue the two boards together.
The final step was to glue our clips on. I used small metal clips I had left over from another project I had gotten at Hobby Lobby. Tabitha used clothespins we had stained with our dark walnut stain.
Done! Easy cheesy!
We’re hoping the Dad’s love them as much as we do! We’ll be stopping by their offices at some point to see if they end up getting displayed.
What do you think? Who would you make one for?
Making one for Mom or Grandma would be a lot of fun because they could be a whole lot more feminine and have a lot more embellishments, don’t you think?
See you next Tuesday,
Summer and Tabitha